
Hello friends, welcome to the Rom Genius website. If you want to know how to flash/install PixelOS Custom Rom ROM then you have come to the right place, you will be shown the very easiest way to flash PixelOS Custom Rom ROM. Just watch and understand each step given by us carefully.
Disclaimer:-
If you skip even one step or do it here and there, you may face difficulties in flashing the PixelOS Custom Rom ROM and you will not be able to flash it properly, then your mobile may also get bricked for which you will be responsible.
Benefits of installing PixelOS Custom Rom ROM
- Customization:- After installing PixelOS Custom Rom ROM, you will get the option to customize Redmi Note 10 Pro Max in unlimited ways.
- Performance:- After flashing PixelOS Custom Rom ROM, the performance of Redmi Note 10 Pro Max will be much better than before.
- Update and Support:- After flashing PixelOS Custom Rom ROM, you will get to see the update first in Redmi Note 10 Pro Max than other mobiles.
Disadvantages of installing PixelOS Custom Rom ROM
- Volding Warranty:- After flashing PixelOS Custom Rom ROM, if your mobile is in the warranty period, then the warranty of your mobile will be void.
- Risk of Bricking:- If you do not flash the PixelOS Custom Rom ROM carefully now, your mobile may become bricked.
- Security Risk:- After flashing PixelOS Custom Rom ROM, the security of your mobile will be lost and your mobile can be easily hacked by anyone.
Pre Required
- You must have a laptop or PC
- Your mobile should be Android 12
- Both laptop and mobile should be charged more than 90%
- Back up all your mobile data
- You must have an original USB Cable and OTG
- Remove MI Account
- You have to remove all passwords from your mobile.
- Download the PixelOS Custom Rom ROM file
- Unlocking Bootloader Before Flashing PixelOS Custom Rom ROM
- Before flashing PixelOS Custom Rom ROM, you have to unlock the Bootloader and then install TWRP recovery.
- Turn on Developer Mode:- Setting→About Phone→Mivi Version→Tap to 8,9 Times
- OEM Unlocking and USB Debugging Enable:- Setting>Additional Setting→Developer Option→Inable OEM and USB Debugging

Download Required files On Redmi Note 10 Pro Max
| Files Name | Files Link |
| PixelOS Custom Rom | |
| Recovery (PixelOS Custom Rom) |
|
| Mi Flash Unlock Tool | Download |
| Platform tool | Download |
| ADB Setup File | Download |
| Magisk File | Download |
How to Install PixelOS Custom Rom ROM On Redmi Note 10 Pro Max
Watch and understand each step given below carefully.
Step1>Unlocking the Bootloader On Redmi Note 10 Pro Max
To Unlock the Bootloader, read and understand the steps given below carefully.
- You have to connect the Redmi Note 10 Pro Max mobile to your laptop or PC via a USB Cable and open your laptop or PC.
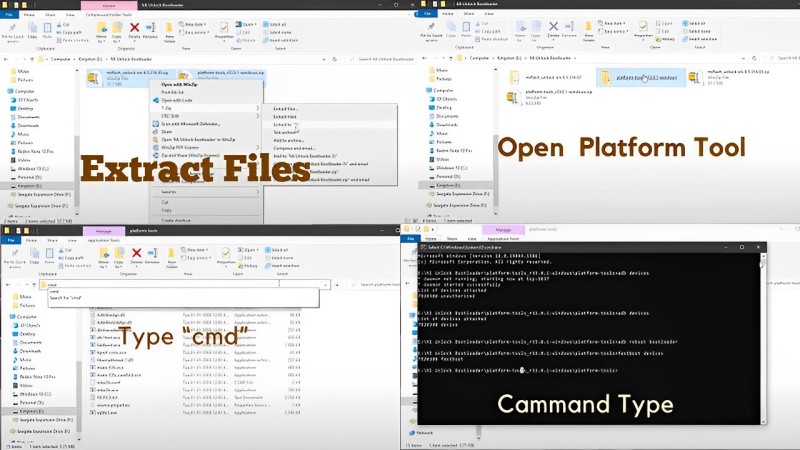
- Download the file and Extract it on a Laptop/PC
- Mi flash unlock
- Platform tool
- Open Platform tools and Type “cmd“
- Type the First Command
adb devices
- Second Command
adb reboot bootloader
- Third Command
fastboot devices
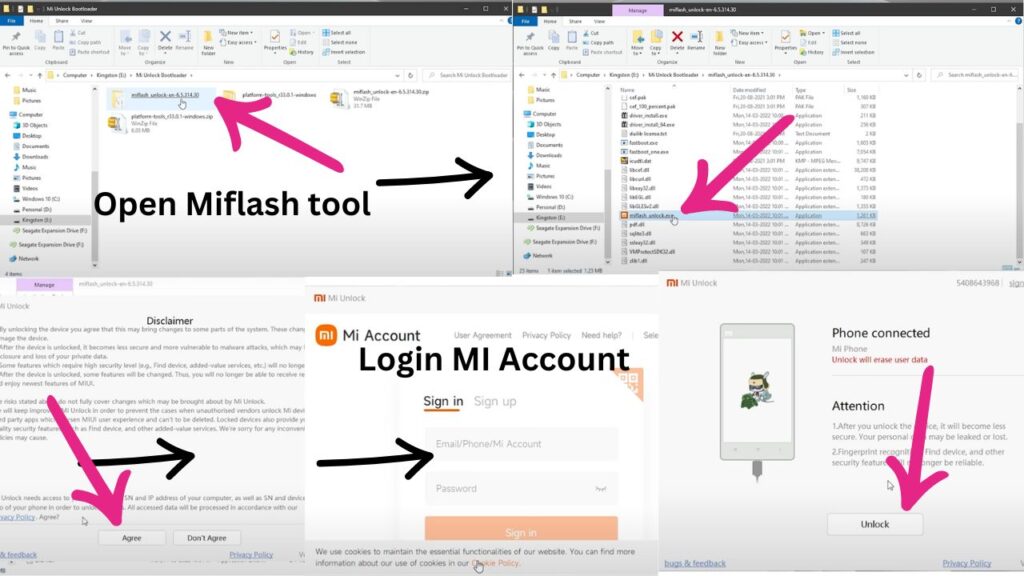
- Open Mi Flash Unlock File→miflash unlock.exe and Agree
- You have to Login to your Redmi Note 10 Pro Max MI account, then you will see the unlock option, click on it, and unlock the bootloader.
- Now after rebooting your mobile, the Bootloader will be Unlocked in Redmi Note 10 Pro Max .
Step2>Install TWRP Recovery On Redmi Note 10 Pro Max
To install TWRP recovery in Redmi Note 10 Pro Max , see and understand the steps given below carefully.
- Download TWRP Recovery from official website and ADB setup files
- Open the ADB setup file, type Y and Inter Button 3 Times, and install the drive that is recommended.
- TWRP Recovery file has to be pasted into the folder named ADB.
- Go to Fastboot Mode:- Pressing the volume down(-) button and power button together
- Redmi Note 10 Pro Max has to be connected to a Laptop or PC.
- Open the ADB Folder and Search “cmd“
- Type the First Command
fastboot devices
- Second Command
"fastboot devies recovery" And Paste TWRP Recovery File
- Third Command
"fastboot boot" And Paste TWRP Recovery File
- Now your Redmi Note 10 Pro Max is Booting Turp
- Install Magisk File:- Install→Select File Folder→Select File→Swipe→Reboot
- Now TWRP Recovery is getting installed on your mobile.

Step3>Install PixelOS Custom Rom ROM On Redmi Note 10 Pro Max
If you want to install PixelOS Custom Rom then you are in the right place. To install PixelOS Custom Rom, you will have to unlock bootloader and install TWRP Recovery. If you have not done both these things then do them, and see the steps given below carefully.
- Go to TWRP Recovery
- Have to press Power button + Volume Up button together for 9 – 10 seconds
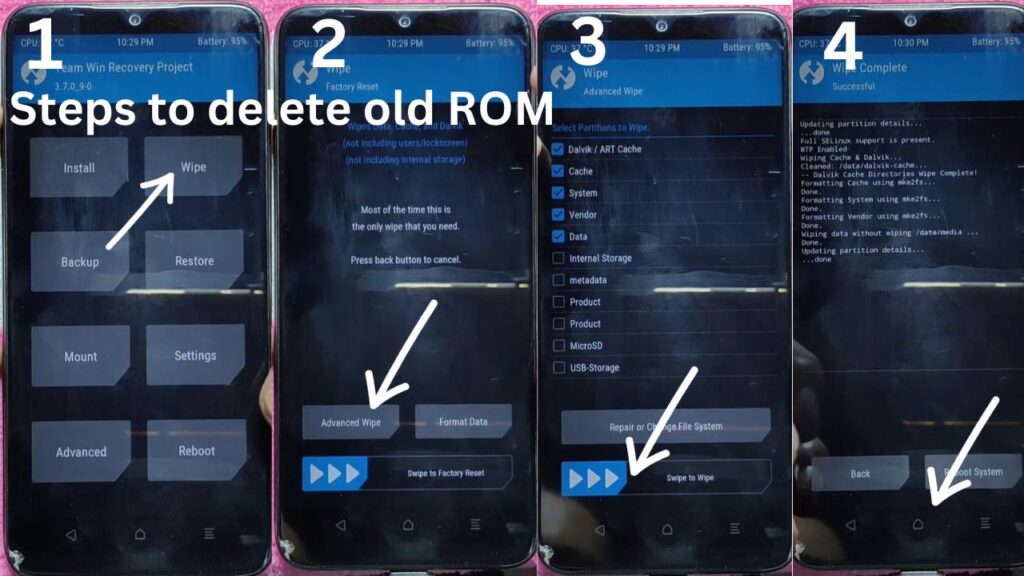
- Have to delete old ROM
- Wipe → Advance Wipe → Select Dalvik, cache, System, Vendor, Data → Swipe to wipe → Back to Home page
- Now you have to install PixelOS Custom Rom
- Install → Select PixelOS Custom Rom file Folder → Select PixelOS Custom Rom and PixelOS Recovery → Swipe to Confirm Flash (It will take 3 to 5 minutes to flash)
- After flashing you have to swipe wipe cache and reboot system.
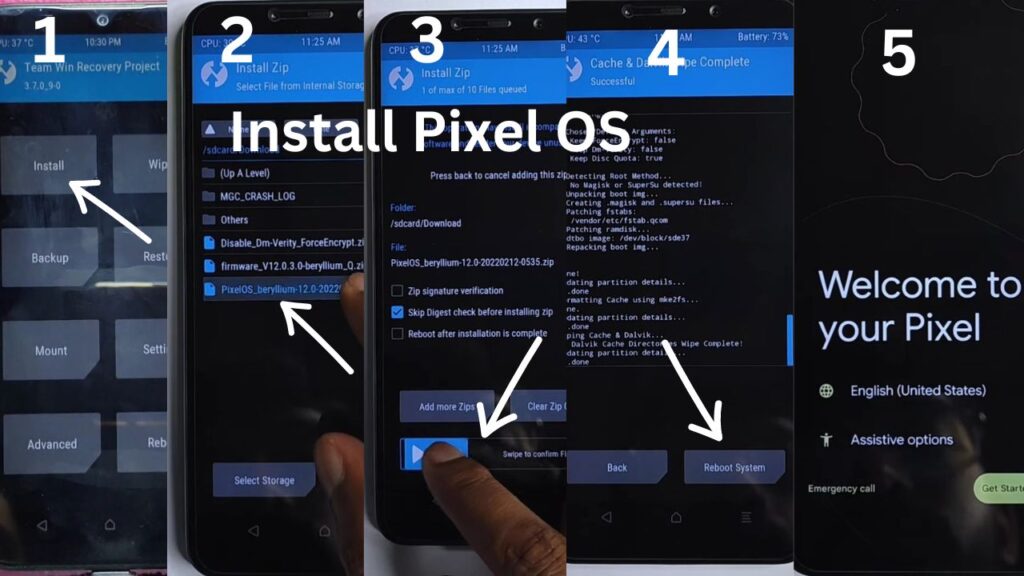
Now your mobile has started booting into PixelOS Custom Rom. As soon as you restart, your mobile will boot into PixelOS Custom Rom and you can setup it in your own way and enjoy PixelOS Custom Rom.
CONCLUSION:-
If you have any kind of problem in installing PixelOS Custom Rom, then please tell me by commenting, I will definitely tell you the solution to your problem and if you have installed PixelOS Custom Rom properly, then you must give a good comment so that we can and be able to tell you better. Thank you.